
hello comrades! It’s been a minute! I’m back with my first tech update since upending my entire life and getting re-settled! Let’s talk 
What I’ve been up to
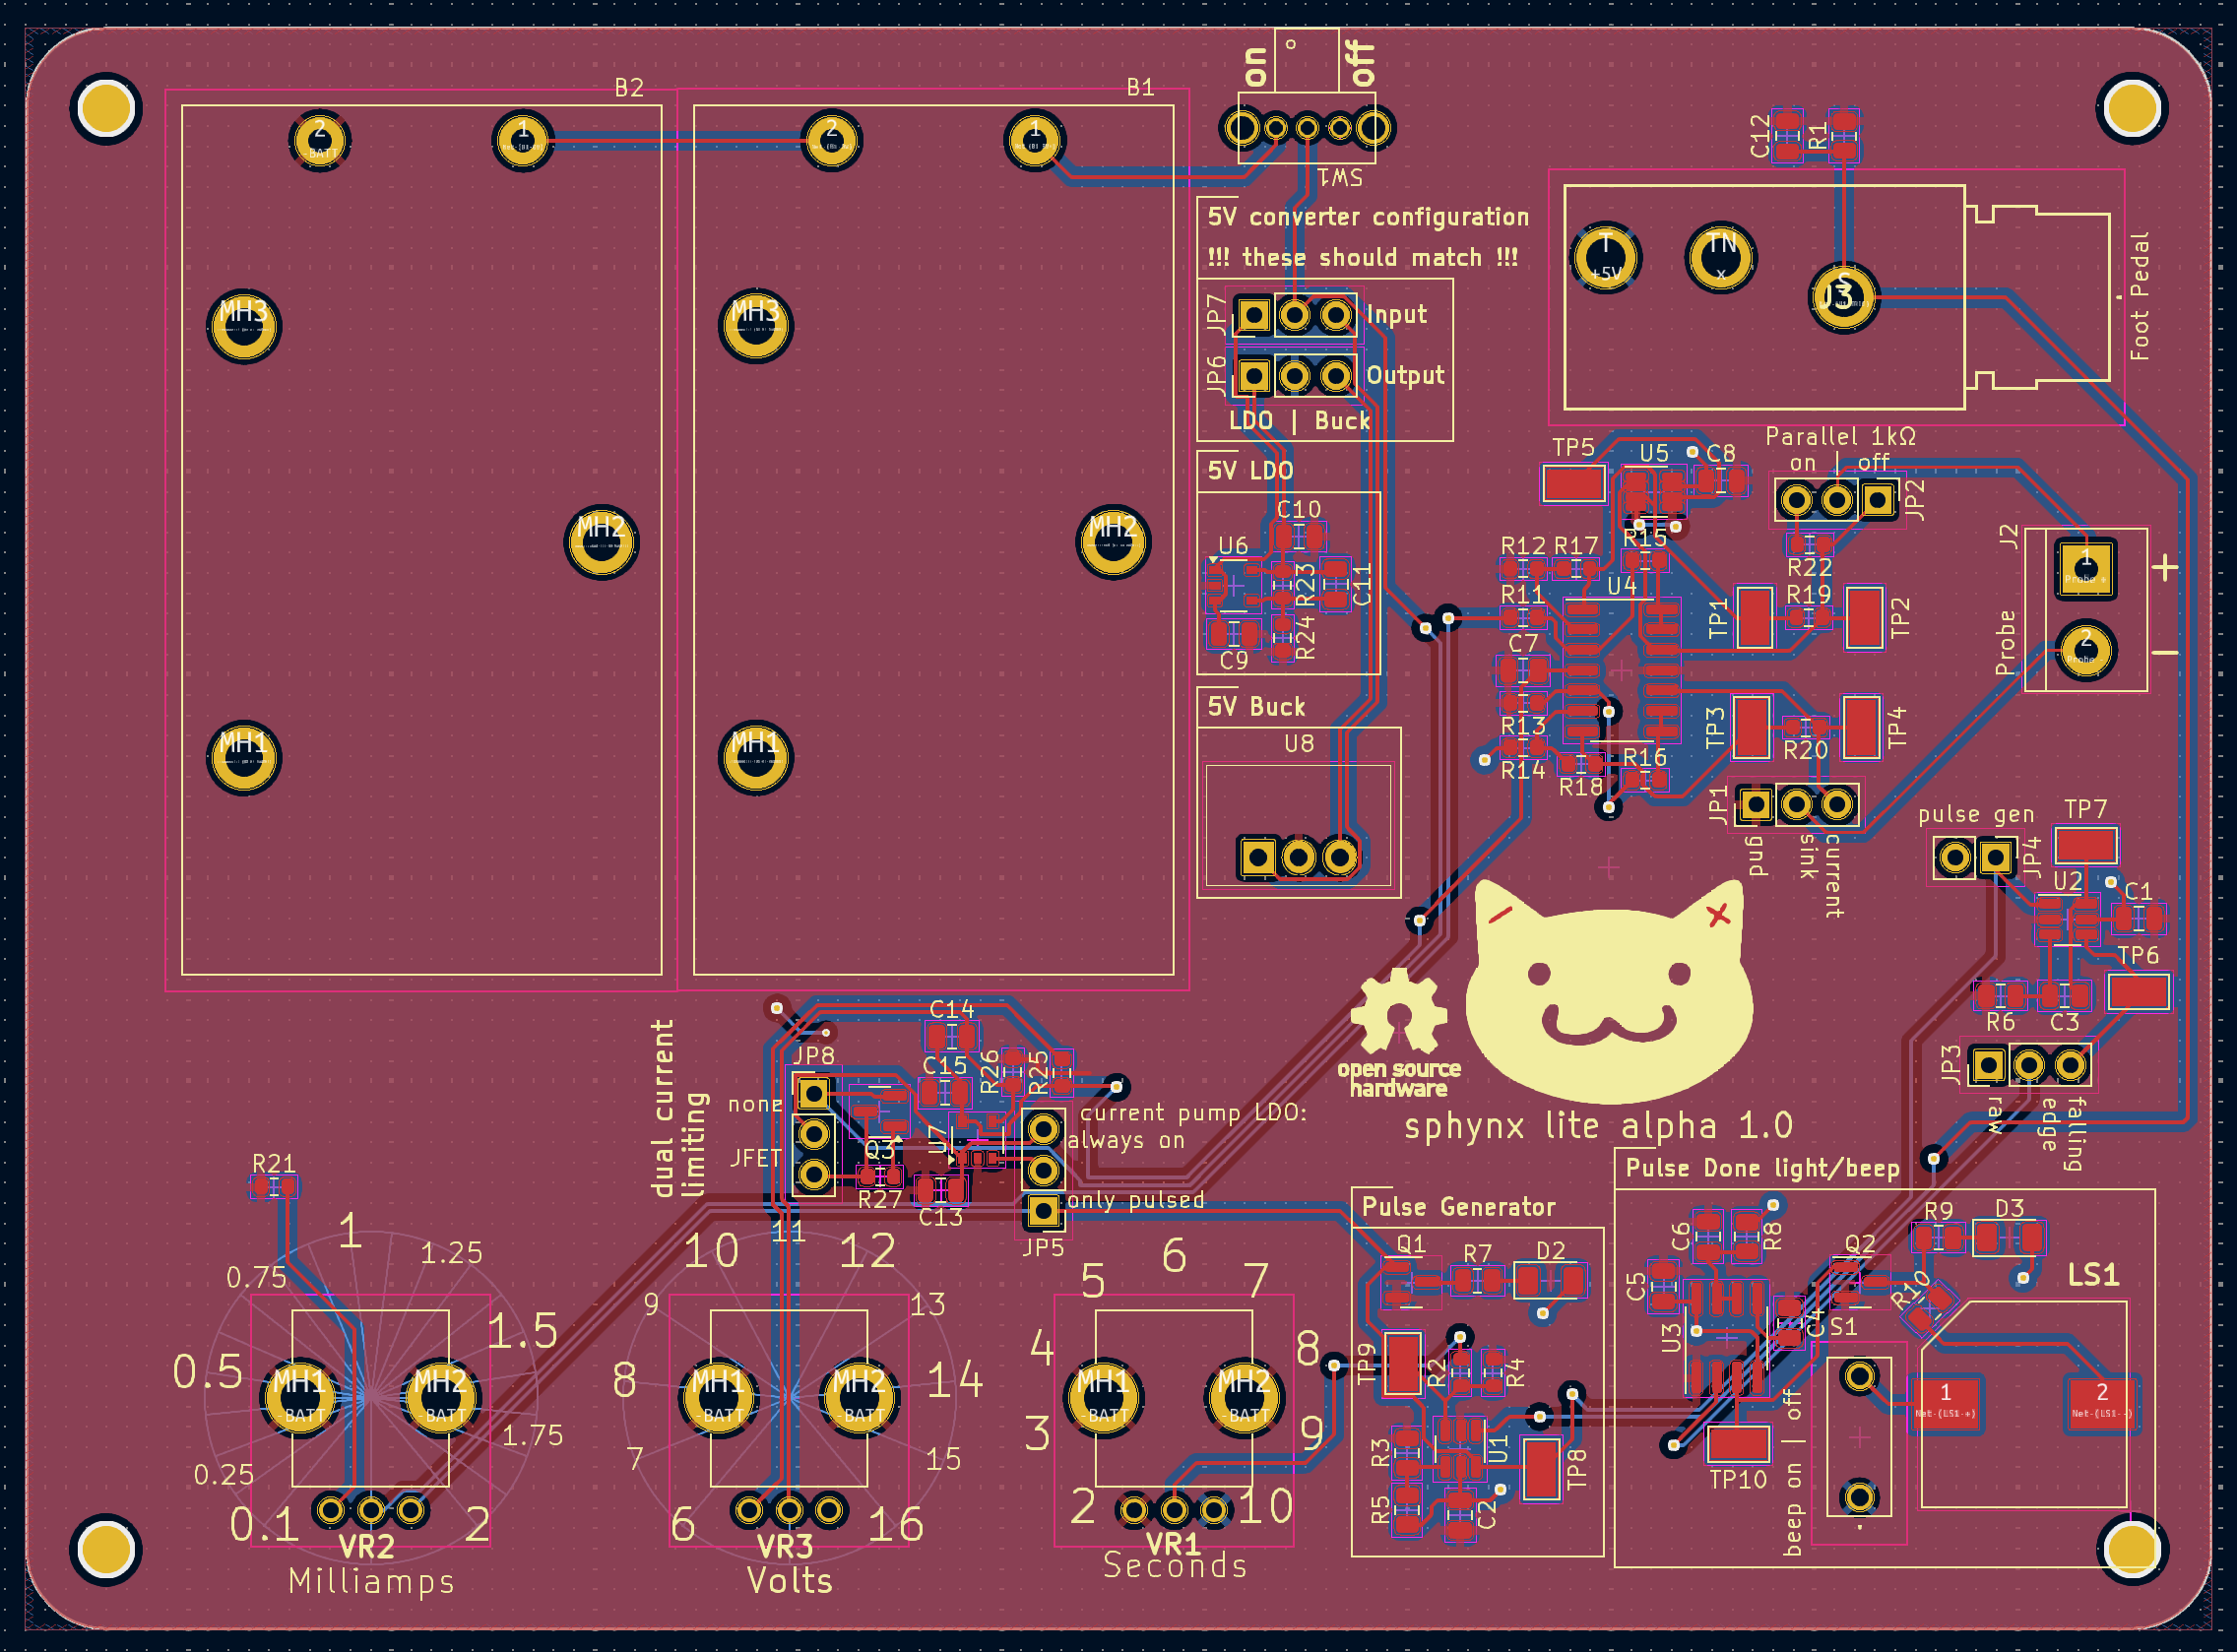
See for yourself, pictured is the first alpha of the Sphynx Lite. Schematics are on git, go check it out (and if you want to set up KiCAD to view or edit but aren’t quite sure how, say so in the comments and me or someone else will help you out!)
Issuing guidance on the usage of these things is complicated. I’m always going to be a little apprehensive recommending that people use this, because I’m a very cautious person. For now, I think my official guidance is:
- you should understand the circuit
- you should have basic debugging equipment
- you should have the time to work with it extensively
- if you meet all of the above, I provide this with no warranty and no guarantee, knowing you full well have ideas as to what you might want to use it for
- If you have a decent working knowledge of electrical engineering and want a walkthrough, I might make a Matrix so I can actually communicate with people looking to get it going??
As it gets more mature and I revise and revise until I drop the alpha, I’ll trust it more.
This was a push across the finish line. I optimized for getting something testable done with the correct topology, layout is a little dicey (cut off silk screen in the bottom right  ) and subject to change, I just needed something to test on. I was gone for over two weeks from my last post here, mainly because it was just a lot of work with nothing intermediate to report. But now it’s here! This has all the working parts of the last boards merged into one, with the new additions of:
- power conditioning
- 9V battery holders
- additional safety measures, like the redundant current limiting JFET
- configuration jumpers! and test points!! !!!
Oh, and I whipped up a cute lil logo. :3
Schematics
schematics in here


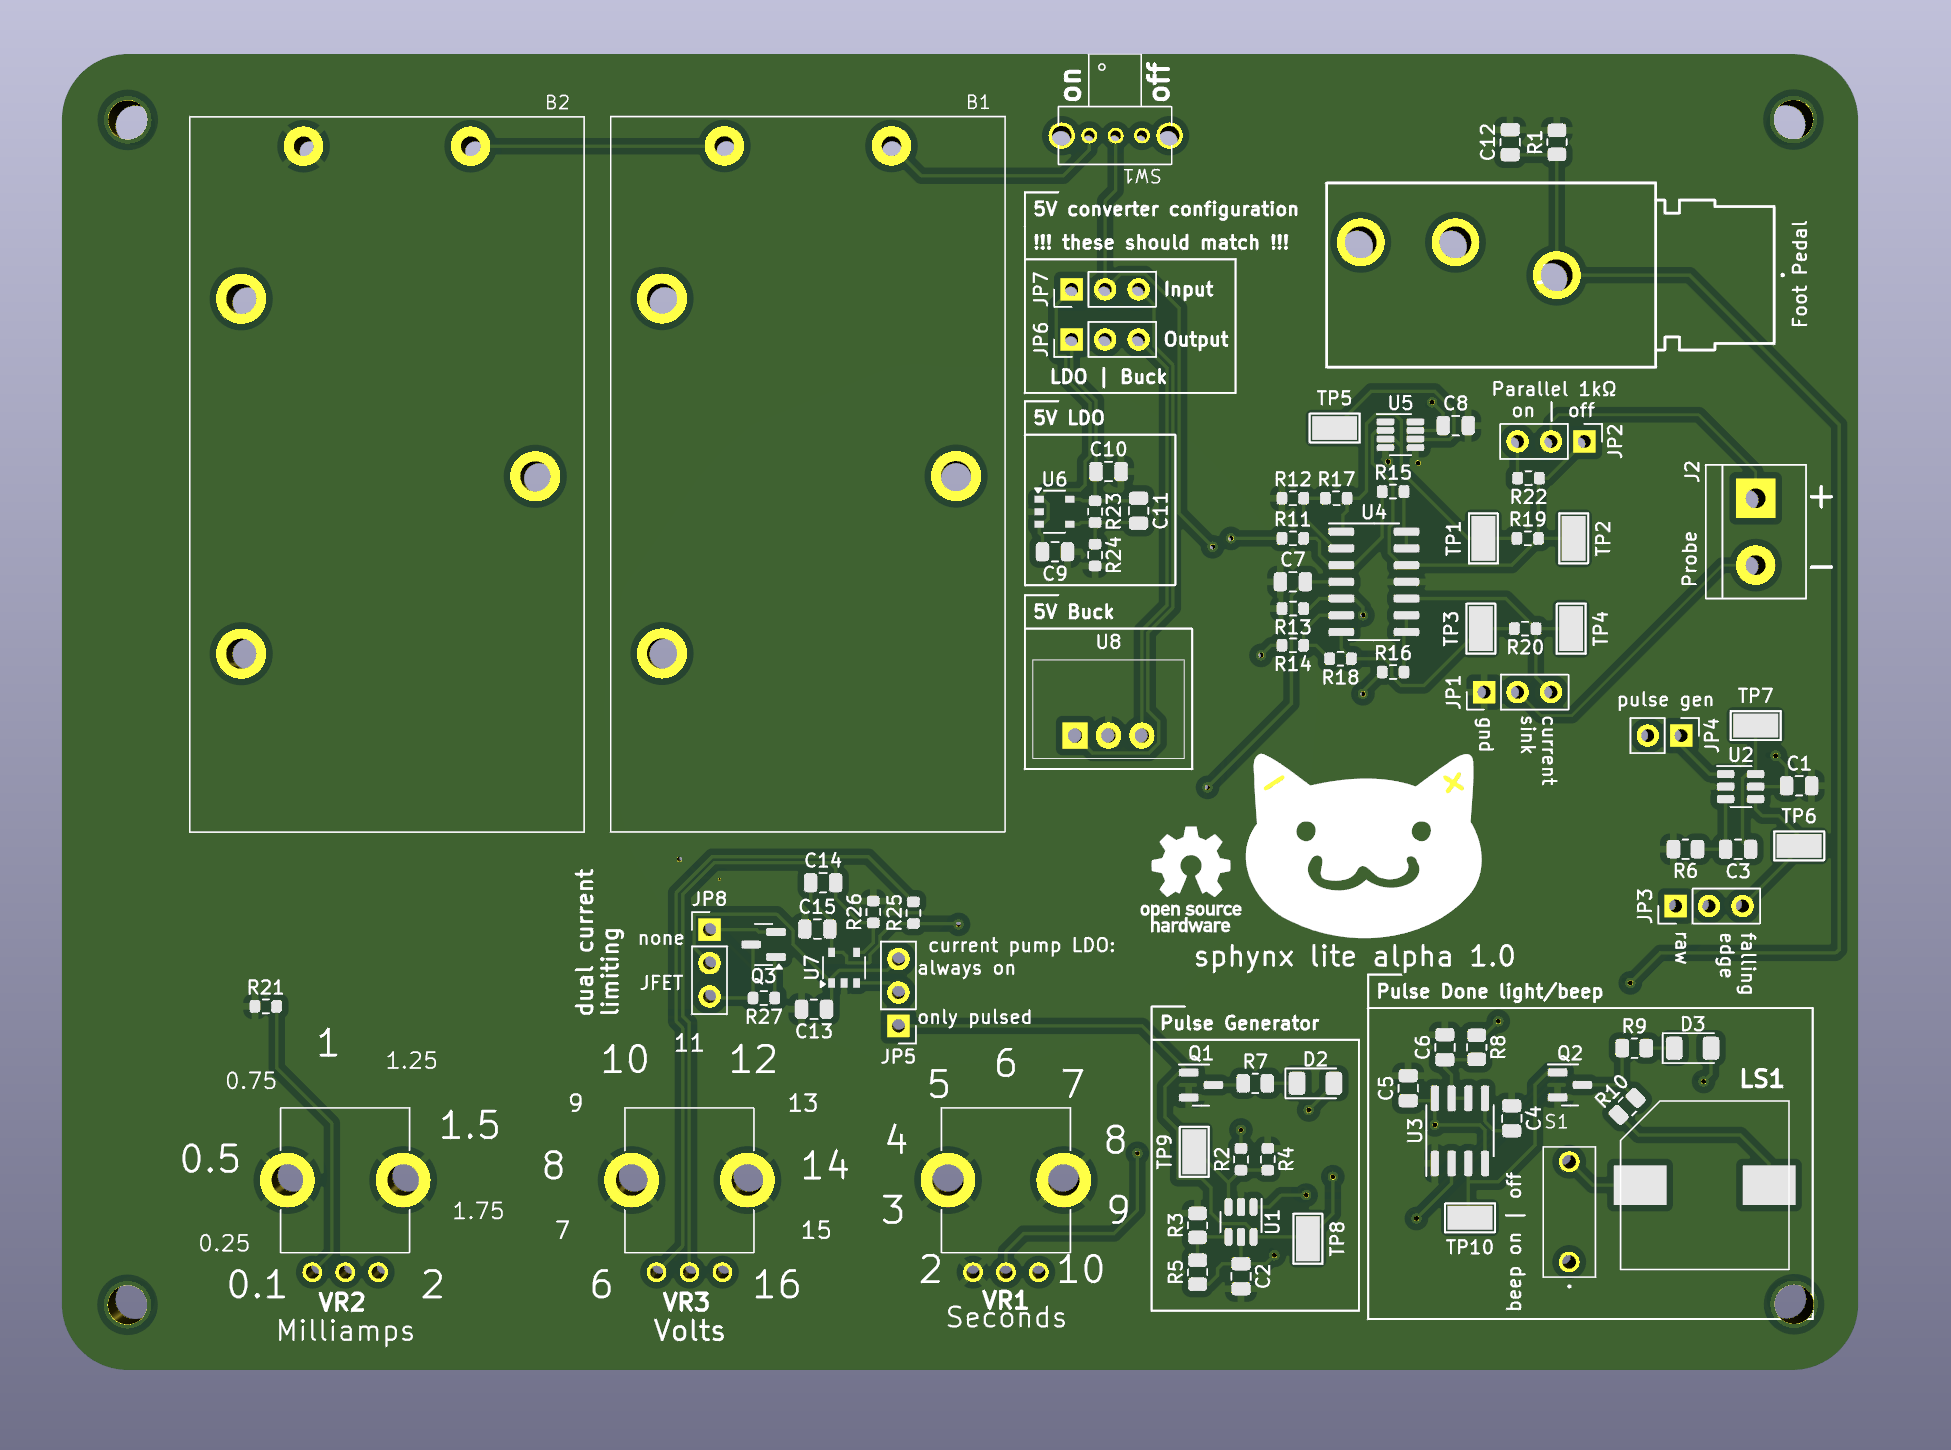
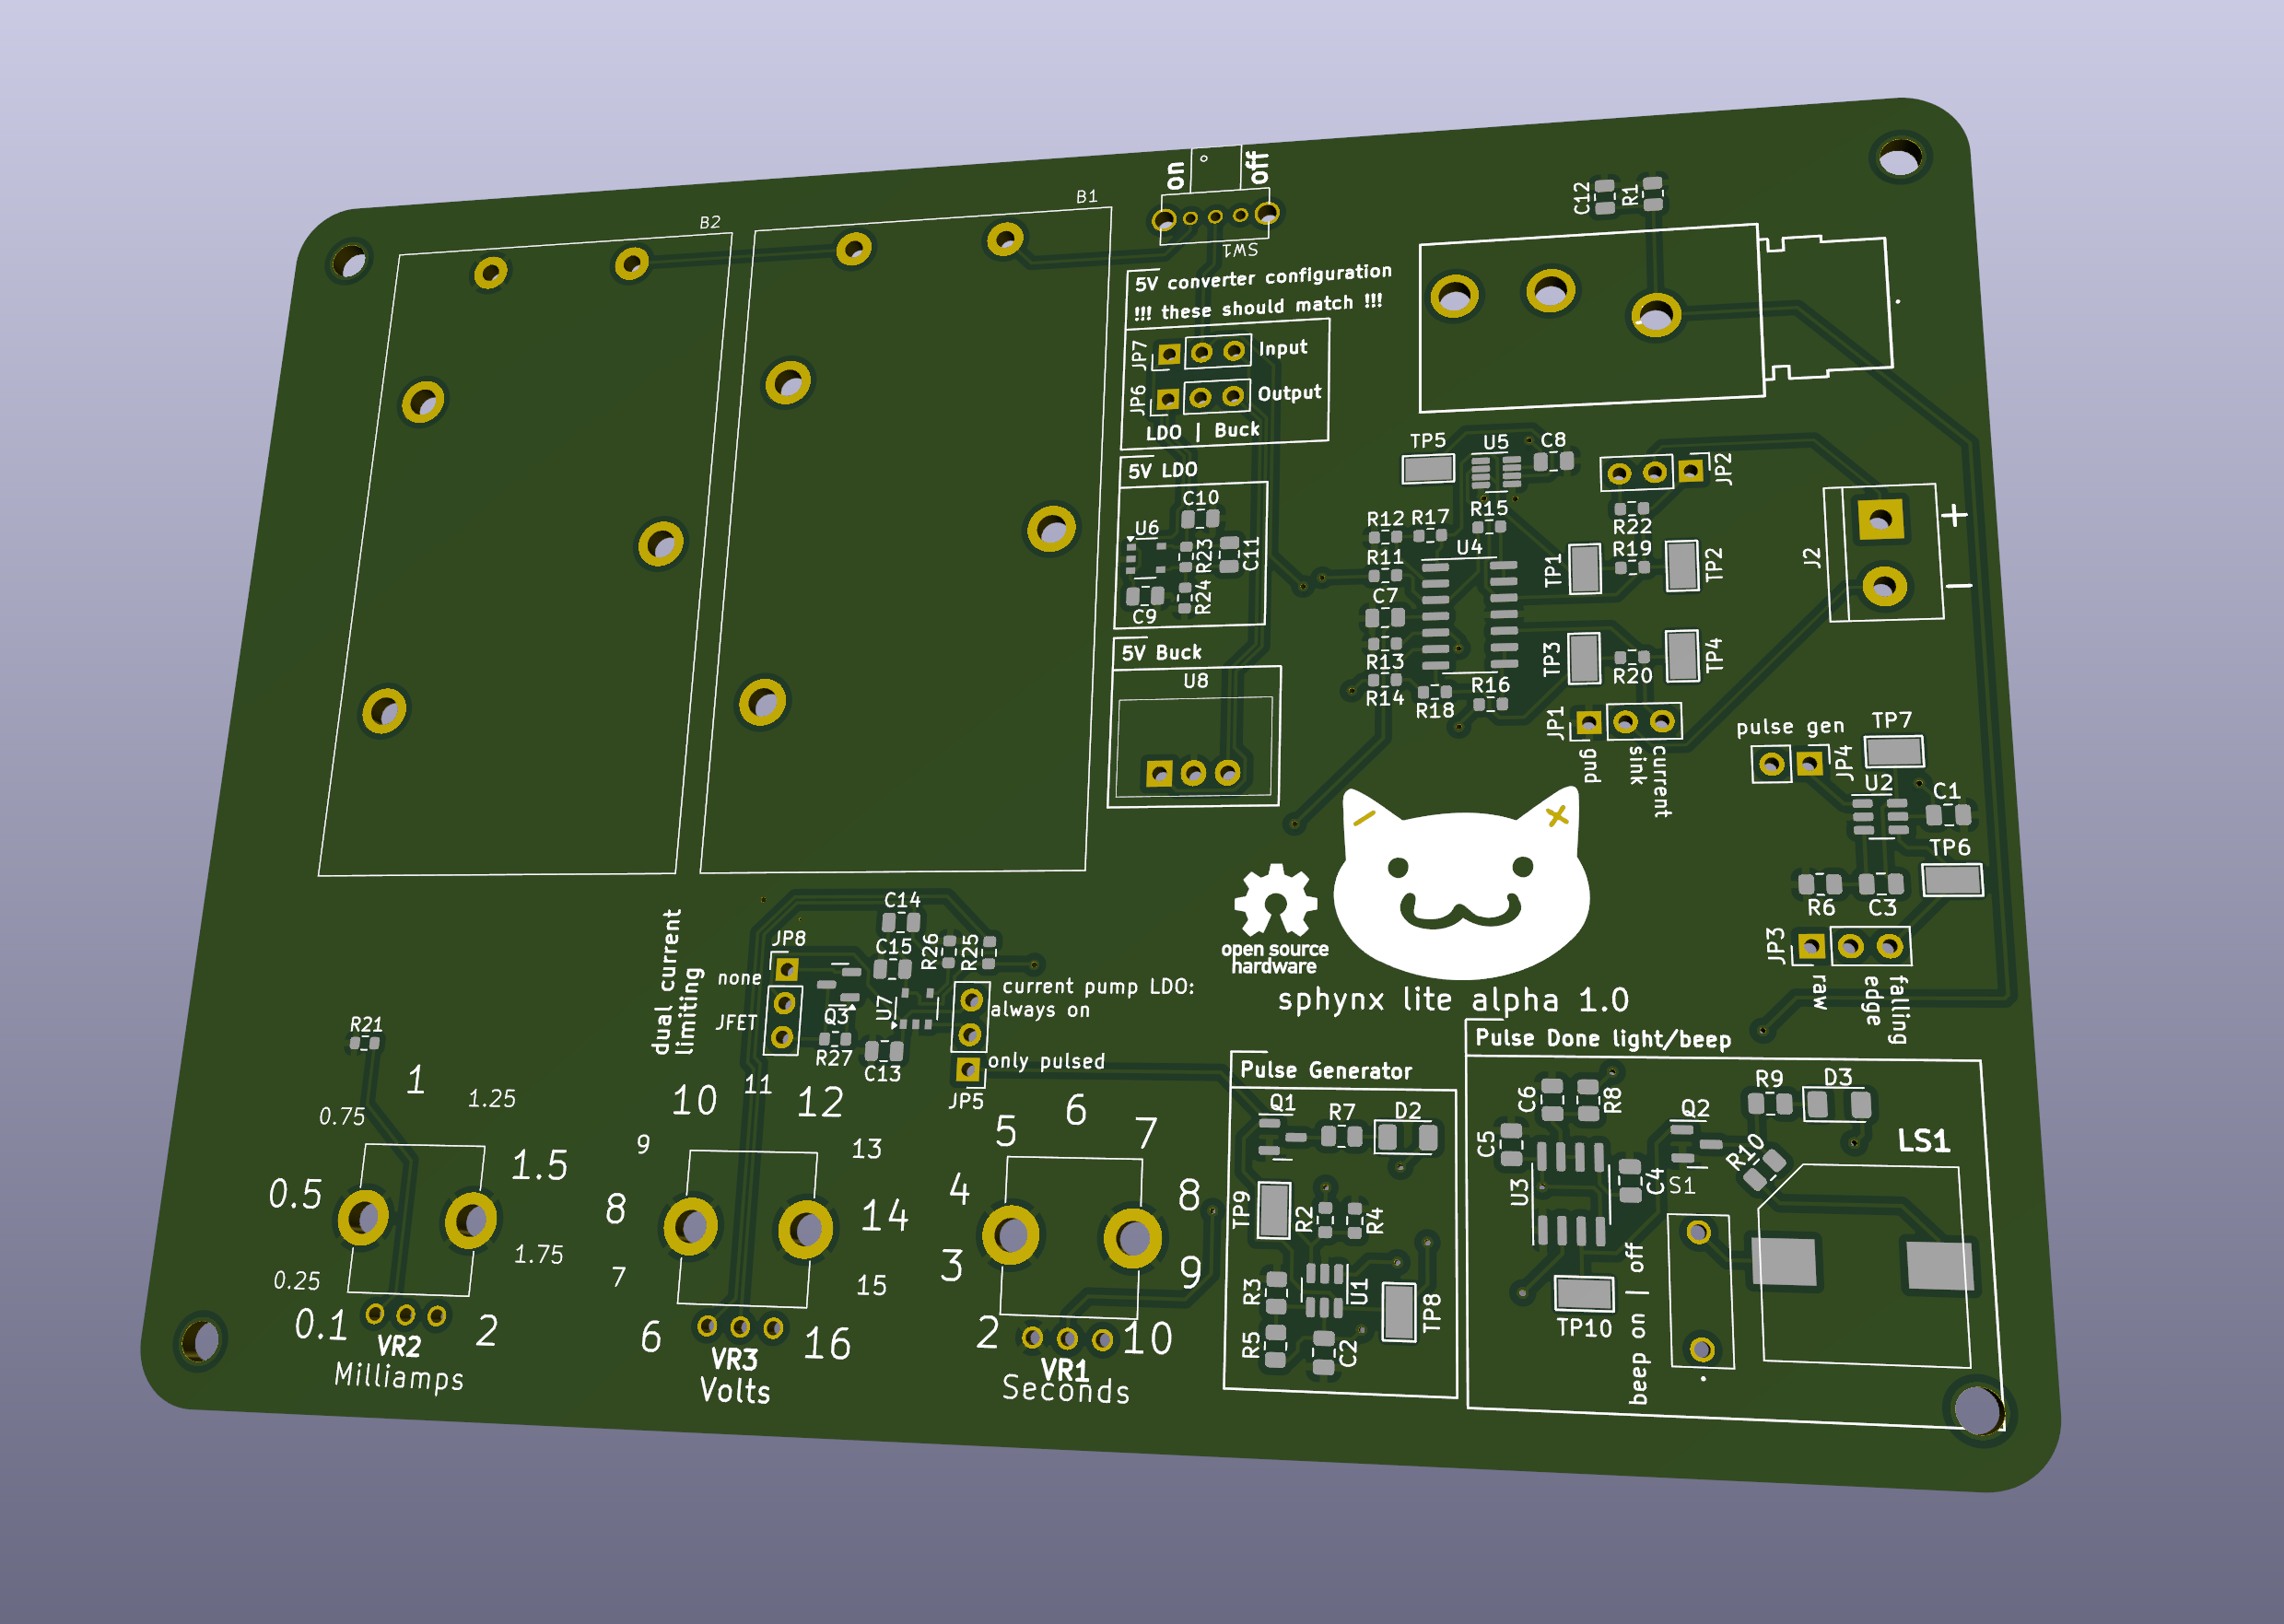
Board Layout
board layout in here

Board Renders
board renders in here

Next up
I have a lot of really good work from y’all that I need to capture and incorporate. Particularly, my immediate plans while this board is fabricated and shipped are to:
- Incorporate @ComradeEd@lemmygrad.ml’s patchset porting the site to Jekyll - really thank you so much for this, I’ve been extremely focused on the board, and now that I have a minute, I can get the site going so I can use it to show off, post guide, aggregate educational resources, etc. This is going to be absolutely necessary for the project to have the reach and accessiblilty I’m hoping it gets. Thank you.

- Build a probe per @YearOfTheCommieDesktop@hexbear.net’s work into coming up with a probe holder. I have a handful of the Yasutomo’s to experiment with. This is going to be a game changer, currently I’m doing self-work with an alligator clip and it’s extremely irritating. An ergonomic and reproducible probe with an extremely cheap parts list is critical for the project to function. Thank you.
- More of you provided meaningful help than just these two, these are the two who’s work I’m directly interacting with this minute. Thank you to everyone who has stopped by and made suggestions, I’ve read them all.
The next post will be me building this out and reporting on how well (or whether) it works, and documenting changes for the Lite Alpha 2.
I also badly need to make a BOM. With some effort, anyone who’s built a board together can buy all the parts for this and make one, but it’d be a thousand times easier if I just made a single cart that you can buy that includes every single component. If you want to make an alpha board for fun or debugging, maybe hold off until I have that out.
Any ways to help?
Honestly, those of you who are following this pretty closely have a good read on what’s going on, what’s needed, and what’s upcoming - keep being interested! If anyone wants to make one, I do recommend waiting until I release a BOM, but very soon we miiight be at the point where other people besides me get one of these in their hands.
I could also use some polish on the logo. It’s fine, but it could be cuter, and the lines are a bit funky. I’m going to put SVGs on git soon and if anyone feels like cleaning them up, rearrange the kitty cat face so it’s cuter, fixing my wonky paths, let me know!
Also, and I simply cannot stress this enough - when I’ve been exhausted, when I’ve been deep in executive dysfunction, when I’ve been not feeling up for it, I’ve read through all your encouragement and support throughout the duration of this project and it’s helped me to keep pushing. I would unquestionably not be this far without y’all. Thank you all so much. 
As always, stop by, hang out, say hi, ask questions, tell me what you’ve been up to, design review me, however you’d like to be involved is good by me! I’m thinking I want to make the expected cadence of posts once every two weeks, just because I’m busy and I don’t want to cause alarm when I miss a week. I can always surprise y’all with more frequent posts too.
P.S. - I have no hair regrowth in test areas. 
I don’t know what this is I feel like I’m missing context about what the project is but I’ll upvote and bump since it looks neat.
What is it, what does it do?
hi welcome!
In extremely short, I’m a trans girl with the technical education and material resources to attempt to fix the problem of electrolysis hair removal being frustratingly hard to get. All of the existing ways of getting electrolysis hair removal are one or more of expensive, unsafe, or ineffective. This project, when it’s done, will have none of the above problems by:
- costing less than $100 to purchase all parts and supplies for
- coming with extensive manuals and advice for effective operation
- being designed to the standard of a quality consumer electronic device and then some
Right now, I’m not done, but this is an important milestone. This is my first proof of concept that rolls the entire project into one single board - just build to the design, add batteries, buy peripherals (foot pedal, mechanical pencil for probe holder, and actual electrolysis probes) and go, provided you have electrical engineering knowledge. As I develop over the next month or two, I’ll be removing parts to reduce cost, working out bugs, and making sure it’s designed in a way that lets you order completely built circuit boards so it’s solder-free for the end user - end-game is if you know how to install a 9V battery and turn knobs, you know enough about electricity to use the Sphynx.
Electrolysis is hard to DIY even if I execute perfectly, so some areas (hands, arms, face?) will be doable with self work, others (particularly bottom surgery prep) are best done with a gal pal.
Here’s the primer post.
Oh pog this is a based project.
I don’t understand any of the technical stuff but this is such an amazing project.

Tags:
@Wake@hexbear.net @raven@hexbear.net @ForgetPrimacy@lemmygrad.ml @macerated_baby_presidents@hexbear.net @sharedburdens@hexbear.net @Edie@hexbear.net @BountifulEggnog@hexbear.net @YearOfTheCommieDesktop@hexbear.net @Erika3sis@hexbear.net @CarbonScored@hexbear.net @frankfurt_schoolgirl@hexbear.net @oscardejarjayes@hexbear.net @crosswind@hexbear.net @lilypad@hexbear.net @OurToothbrush@lemmy.ml @tartan@lemmy.ml @AernaLingus@hexbear.net @SnAgCu@hexbear.net @naevaTheRat@lemmy.dbzer0.com @lapis@hexbear.net @Hurvitz@hexbear.net @jwsmrz@hexbear.net @MarxGuns@hexbear.net @AbbysMuscles@hexbear.net @pooh@hexbear.net @Chronicon@hexbear.net @AmaryllisBlues@hexbear.net @tactical_trans_karen@hexbear.net @TheDoctor@hexbear.net @aphir@hexbear.net
If you’d like to be on the tag list, or if you’re on the tag list and would like to be removed, let me know here!
add me pls
this is awesome
added! thanks for being around! let me know if there’s anything you’re curious about and i’d be happy to talk about it!
just waiting on the point where I can build a prototype as a savvy amateur! Or at least evaluate if I’ve got the skills for it (tiny SMD soldering a bunch of parts could be a challenge, though one I’m probably up for)
It’s fun! Get a practice board and once you realize SMD isn’t actually that hard you’ll be able to shrink your projects
I’m conflicted because that sounds fun but also there’s enough ewaste in my apartment already.
I’ve done SMD soldering in bits and pieces successfully but it would be nice to hone my skills. It won’t shrink my projects though because I don’t have any :( too busy lately
The completed board does mostly sit around but I find it useful to pull it out and see “oh how big was 0603 irl, is this going to be annoying” when choosing footprints. Hope things calm down for you!
This is amazing and I’d love to be tagged on this please!!
added!! thanks for stopping by!
Here’s my first post if you haven’t heard of the project before and wanna see the initial motivations/primer!
could you add me please? also this project is really cool and you are doing amazing work!
added!
Tag me plz!
added!
Please add me. I plan on putting one together when you get the BOM. I am an electrical engineer, although most of my professional experience is in software. My EE experience is more as a test engineer than a designer.
cool! I’m excited that you’re excited! I’d probably recommend waiting at least until the next alpha at this point, there are a ton of brand new changes in this and I’d hate to have you build something completely busted. I might be three weeks instead of two on the next post, but I’ll try to remember to let you know if it’s a complete dysfunctional mess as soon as I know. You’re on the watch list now btdubs
Tag me pleasssse
added!
 2·26 days ago
Could you change my grad account, @ComradeEd@lemmygrad.ml, to this one.
done! and forgot to update you with such! but you have your new account in the tags!

Whooooooo lets gooo! Ive been a bit out of it and havent been following up but you rock and its so great to see this coming along and have board(s) fabricated! No regrowth in test areas is wonderful, congratulations!
You seem dissatisfied with the speed of your progress, but I’m in awe of you. You’re amazing.
I was so excited about your update that I told my husband all about your project, and his response was, “This is what the Internet is supposed to be.” ❤️ I couldn’t agree more.
You’re doing inspiring, exemplary work. Thank you for your service, and thank you for keeping us updated.

thank you and also you’re gonna make me cry

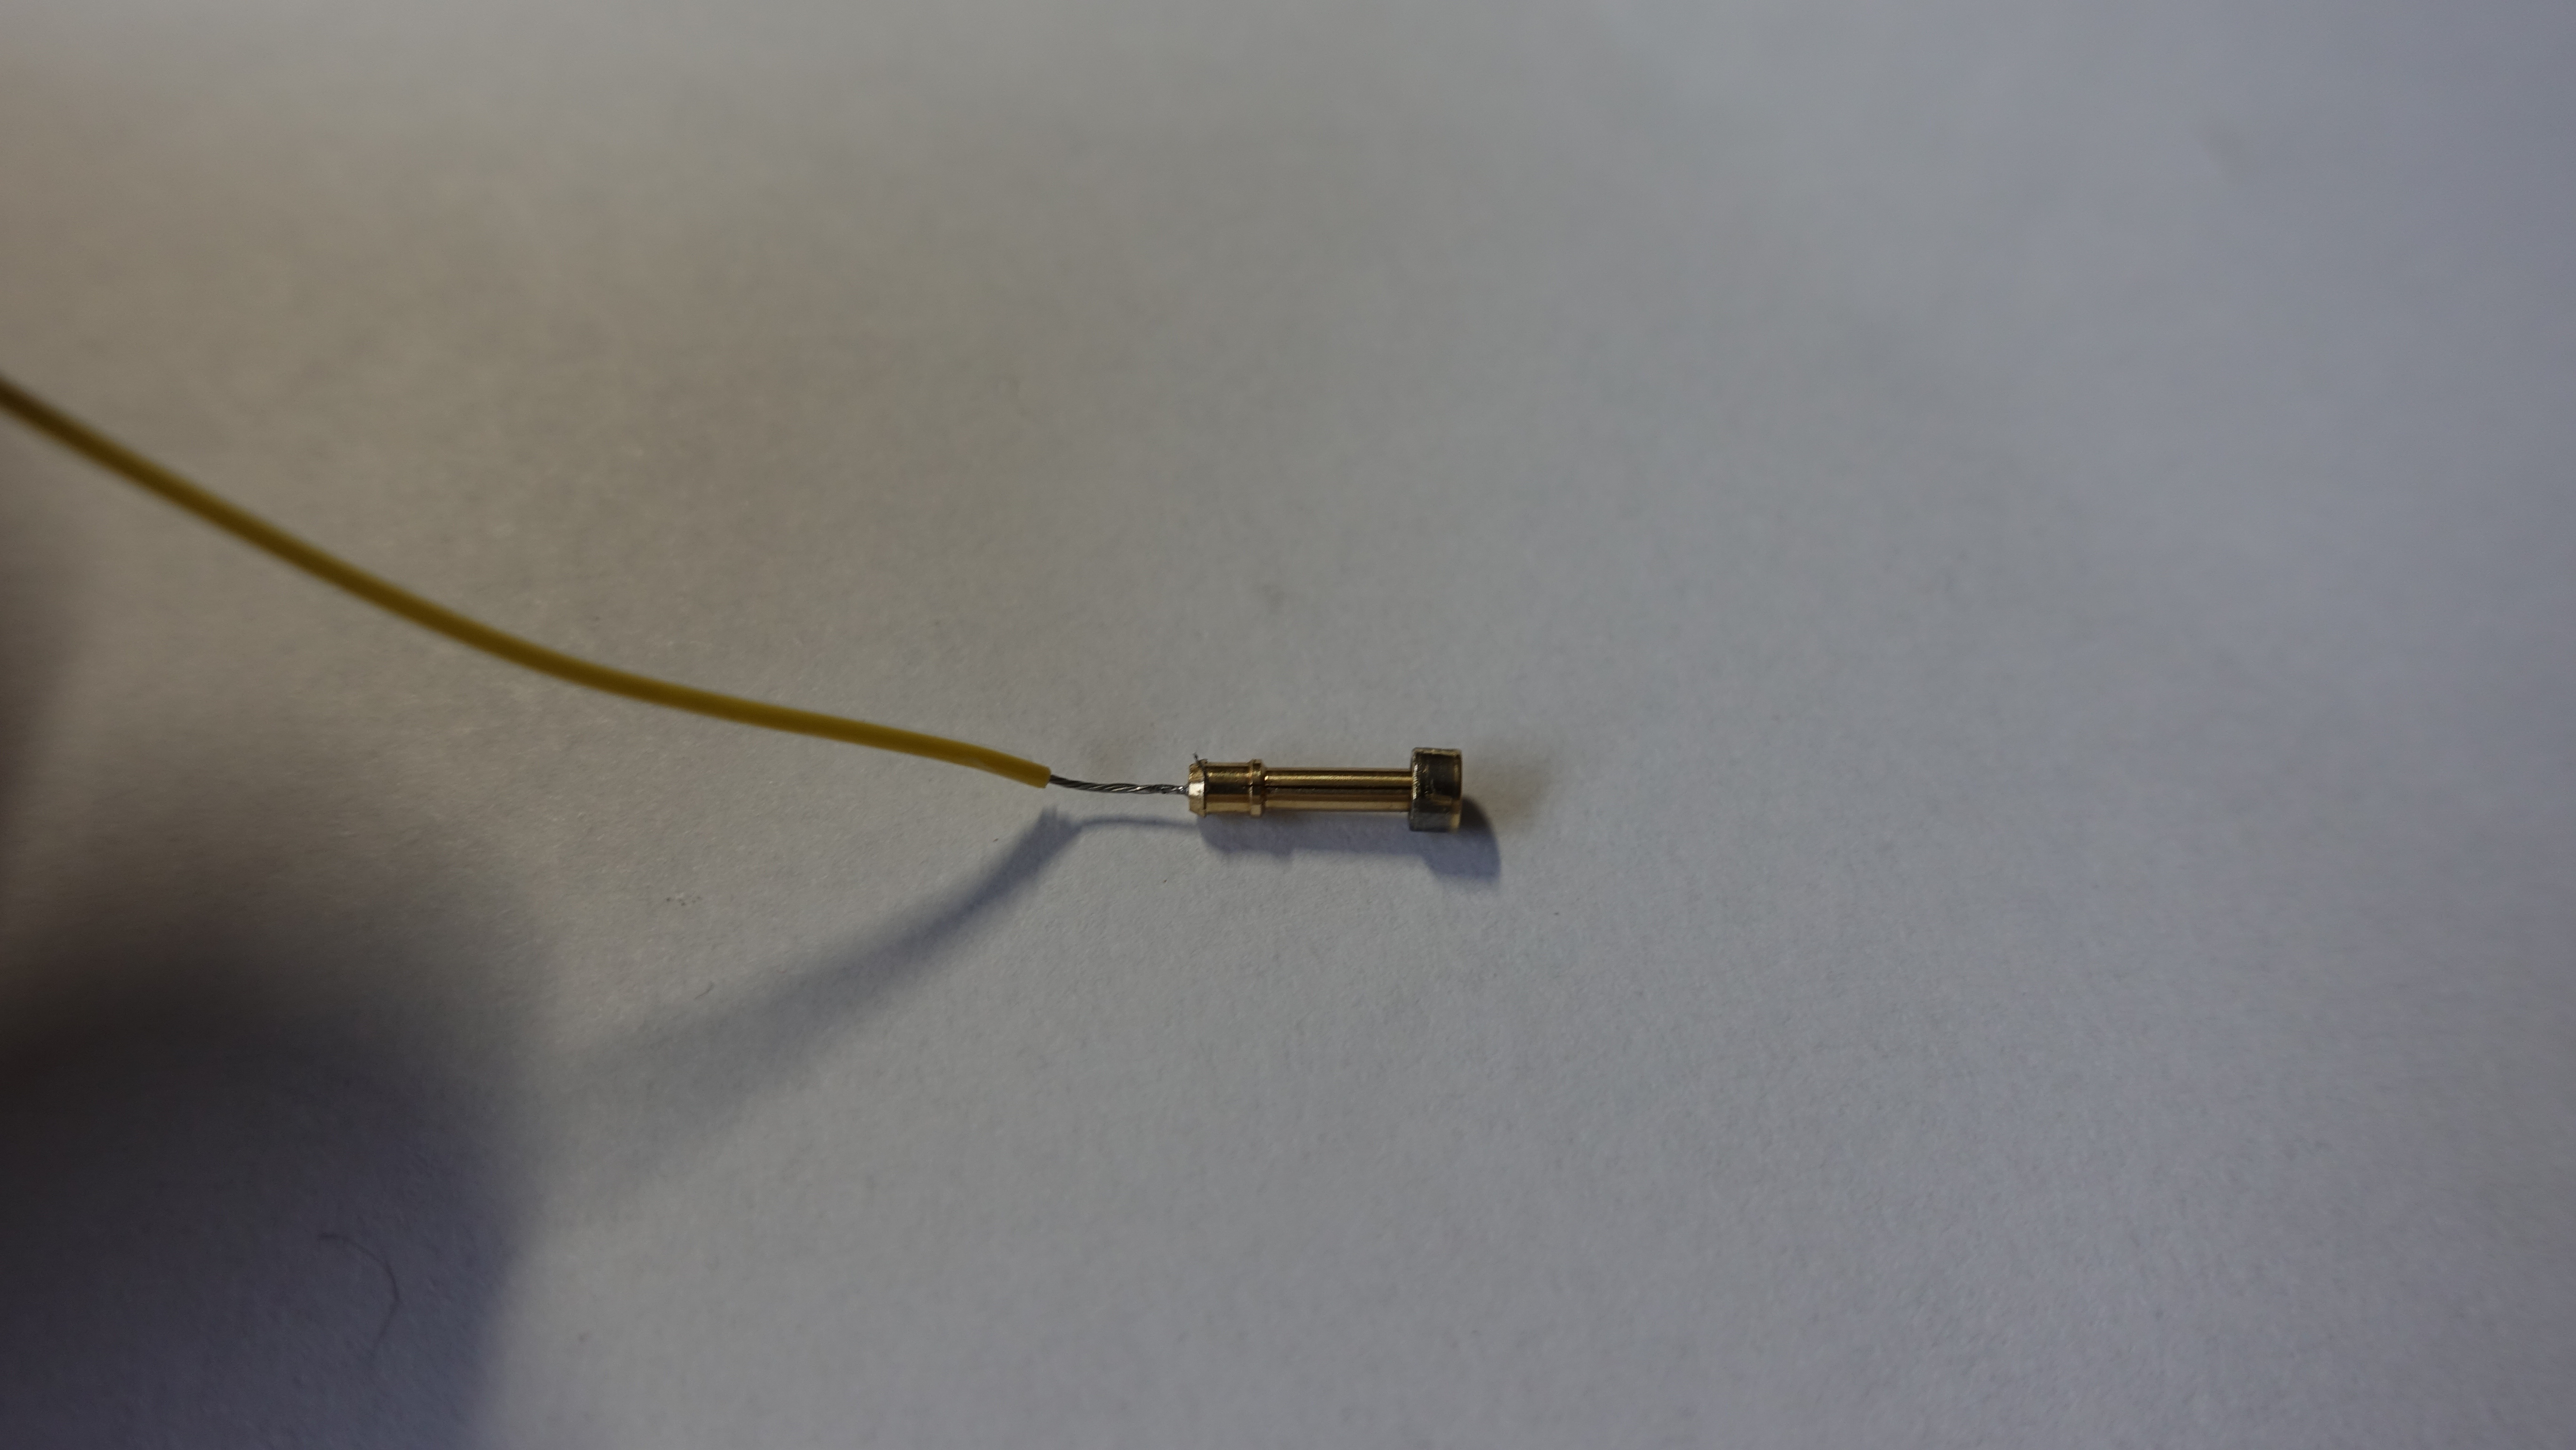
@YearOfTheCommieDesktop@hexbear.net - How did you get the collet out of the Yasutomo Artist Pencil 1.1mm? I’m genuinely amazed at how well it holds a probe and how easy it is to install one, but I can’t figure out how to get the collet out of the body of the pencil for soldering a wire on to. What did you do there? I tried pushing it in the tip and out the back thru the lead cylinder but I’m scared I’m going to break something, I already put a decent amount of force into it
yeah that’s definitely the toughest part… the collet needs to come out the front of the pencil, it can’t fit out the back. It is barbed (visible in this pic if you zoom way in) so it digs into the plastic pretty damn well, but it can be pulled straight out.
I basically just used brute force. it should be pretty safe to pull straight outwards on the collet by the ring part (the part that moves freely) since that way there’s no bending, its all metal on metal, in tension, and the thin members of the collet are pulled snugly together and stressed evenly. you can use a small pliers but you don’t want to squeeze too much. either grab the ring head-on and squeeze enough to get a grip, or use a sufficiently tiny pliers to grab from the side between the spring and the collet ring, not squeezing basically at all and just hooking the jaws of the pliers under the ring and pulling out. Some wiggling/wobbling the collet (while still pulling outwards so nothing bends) as you go could help but will probably make the fit looser when you go to put it back in so don’t go overboard.
I don’t think there’s a great way to push it out from the rear either, since behind it there’s a narrowing of the hole in the plastic to about the same size as the one on the back of the collet. Maybe if you had just the perfect 1.5mm rod or something but it would probably just buckle.
this is definitely quite in there lmao
What tools did you use? I’m working with what I have, which at the moment is an allen key and a cotton swab with the ends cut off. Basically, I put the cotton swab stick down the lead chamber and I’m pushing it in with the allen key (the allen key on its own isn’t long enough to reach the back, I added the cotton swab stick for more reach). So, that is to say, I’m now trying to push the collet out the front from the back. I’m not seeing a way to grab the collet, it’s pretty deep in the tip of the pencil. Does this sound like I’m on the right track?
edit: just re-read your post, I missed that you said pushing it out from the back is a no-go too. oops. Did you have to do anything to the plastic body of the pencil? It looks pretty intact from your photos
edit 2: I got it
 I think trimming the end might actually be mandatory. It wasn’t so bad, I did it with a swiss army knife. The result is pretty clean looking. I just trimmed back enough of the tip so that the shoulder of the wide part of the collet is all the way out when the end cap is pressed, and then from there it was easy to get under it with a pair of tweezers and pull. I bought a few of these, so I’ll do one more and take good photos. It works beautifully and I’ll let you know when I’ve used it for the first time!
Yessss! So glad it worked!
To explain the confusion: I actually pulled the entire lead tube out before separating the collet from the lead tube, (the main body/grip of the pencil is a separate piece of plastic!) so I had plenty of room to grab the collet with tools. However your way might be better, since as I recall it took a fair amount of force to pull the lead tube out the back, and after doing it a few times the two halves no longer seem to click together and stay very well.

I went to school for a bit to become an electronics technician. It’s been a long while, but I can still do some cool stuff and have repaired several things over the years. All I really have is a soldering iron and a multi-meter and I can read schematics, but I don’t have the practice or skills to sort all this out anymore. All this to say, I know how much work goes into this, and you’re amazing! Thank you for your service to the community, unironically. I’m looking into more laser hair removal, but I might forgo it and wait till I can build one of these instead.
hi I appreciate you stopping by! <3
I hope I can have something for you soon! I don’t want to false advertise - laser can do a lot that this can’t, particularly for diffuse dark body hair and minimal session time, and even if (when) I stick the landing and make something perfect, it’ll be challenging to impossible for self use in a lot of the most important areas. It’s ideal if you have another person to work on you or to work on each other together with - it takes things from time consuming and difficult to time consuming and rote but very achievable. I know a fair bit about different hair removal methods at this point though, so if you have questions, about my thing or in general, let me know!
what the fuck they’re on kicad 8 already? I remember complaining about the upgrade to 6. Would you like to upload a render of the back of the board? I don’t wanna upgrade yet I’m in the middle of another project. I’m probably gonna get after you for wasted space (and those on-board 9V holders) but tbh PCBs are surprisingly cheap these days. Are you thinking about making a case for it?
at least for prototype BOM, I suggest just putting all the parts in Digikey or Mouser and using their “share cart” link. you probably have to order stuff anyway so it’s pretty painless. Good work so far!
just updated the post with schematics, renders, and board layout! Thanks for stopping in!
Version 8 is cool! I started the project in 7 and the upgrade didn’t break anything, although it changed the whitespace formatting in text files so I had some crazy git commits. It also comes with some nice but fairly modest features. https://www.kicad.org/blog/2024/02/Version-8.0.0-Released/
Yeah wasted space is definitely a thing here lol, I just wanted to get something usable out the door. I’ll re-pack everything for Alpha 2. Honestly this is pretty bad layout on my part, I focused on laying out each module well, and then at the board level I kinda just slapped things together. It would make JLCPCB kinda impossible, but I sorta love the idea of putting the battery holders on the bottom and using them as feet, and routing in the space on top of them. We’ll see, but I’m really prioritizing JLCPCB orderability at some point, if not right now, for the accessibility, which kinda means everything on top. I’m also inbetween price tiers, I think: 100mm x 200mm is where I’m at now, and the next tier down is like 100mm x 100 mm, which I’ll never hit. I’m barely over 100mm x 150mm, so I figured I might as well just use the space if it’s free. But I totally will repack in the Alpha 2.
I am thinking of an optional enclosure, but that’s for someone in the community to implement if they’d like to! It’d be a quality of life improvement, I’m worried about it getting shorted on stuff as a naked board, but this is also definitely not the final form factor, so nobody should start on that quite yet.
Mouser share cart is the plan for now!
*bonk* you already know what I’m gonna say, this board could be a quarter of the size if you packed it and put components on both sides. Even if you stay single-sided components for assembly, I totally think you could do 100x100mm if you removed the 9V holders and used pigtail-style 9V holders, or (if that causes trouble for assembly) even barrel jacks and some off-the-shelf holders for users.
I like submodules (hierarchical sheets? I’m still on kicad 6 lol) for schematic organization but I guess they make it harder to make your board dense since you end up trying to pack rectangles together.
But I looked at the JLCPCB prices and squishing it down is probably only necessary for your pride. If you start distributing these in numbers high enough for the cost to justify the extra trouble, somebody will rip off the design and start selling it on Amazon and it won’t be your problem anymore.
I will say that committing to an enclosure helps other stuff a bit. Instead of needing the big board space for the batteries, you can just have a pigtail holder and a place in the case where the batteries sit. Depending on how you did it, you’d also have more freedom in (a) less silkscreen space around the pots (b) components between the pots without users brushing them with their fingers. FreeCAD actually has a plugin to import KiCAD models from the 3d view (and then export to some other tool’s format if FreeCad isn’t your jam) so you could make a simple 3d printed case or something. Or (deja vu, sorry if I’ve already suggested this) you could put it into a guitar pedal case. Seems like a natural fit with the 1/4" jack. Once the project is solidified a bit more and I’m less busy I’m likely to order a board, try it out, and possibly design a case.
If you need help with the site I would love to do something. I’m just not great at designing, so I was hoping you could do that.
I have design ideas, yeah! I’m decent at that, and having it all in Jekyll makes it so much better than having to write plain HTML. Thank you again for doing that! I haven’t rolled it in yet but I’m going to try to get to it tonight!


